


How to configure an email account on Android

Configuring your e-mail accounts on Android devices can be the simplest task in the world, if your email address is associated with a server supporting auto-configuration. Otherwise, the procedure is a bit more complex and is detailed below.
To configure an e-mail account on any device, you need essentially 3 information:
- username: usually coinciding with your email address, with or without the domain (eg .: “nullalo@gmail.com” or just “nullalo”);
- password: the password you chose when creating your account;
- incoming (POP3/IMAP) and outgoing (SMTP) mail servers: servers to connect to for receiving and sending mail, provided directly by the service provider. They consist of three parameters: address, port and authentication method (eg .: pop.gmail.com:995, SSL authentication).
Before starting, therefore, it is useful to know the incoming (POP3/IMAP) and outgoing (SMTP) mail servers of our email provider. The main Italian, in the form address: port, are the following:
AOL: pop.aol.com:110 (POP3), imap.aol.com:143 (IMAP), smtp.aol.com:587 (SMTP)
GMX: pop.gmx.com:995 (POP3 SSL), imap.gmx.com:993 (IMAP SSL), mail.gmx.com:587 (SMTP SSL)
Hotmail/Outlook.com: pop3.live.com:995 (POP3 SSL), imap-mail.outlook.com:993 (IMAP SSL), smtp.live.com:465 (SMTP SSL)
Lycos: pop.lycos.com:110 (POP3), imap.lycos.com:143 (IMAP), smtp.lycos.com:587 (SMTP)
Yahoo: pop.mail.yahoo.com:995 (POP3 SSL), imap.mail.yahoo.com:993 (IMAP SSL), smtp.mail.yahoo.com:465 (SMTP SSL)
For Gmail it is recommended to use the dedicate client from Google, available on the Play Store.
Let’s open the “E-mail” application on our Android smartphone/tablet: if it is the first time that we set up an email account, the following screen will show up.
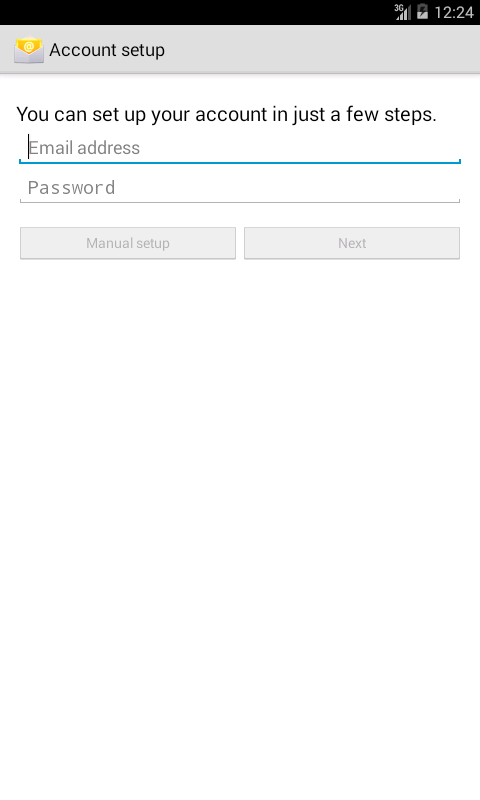
Insert your email address and personal password, and click on “Manual setup“.
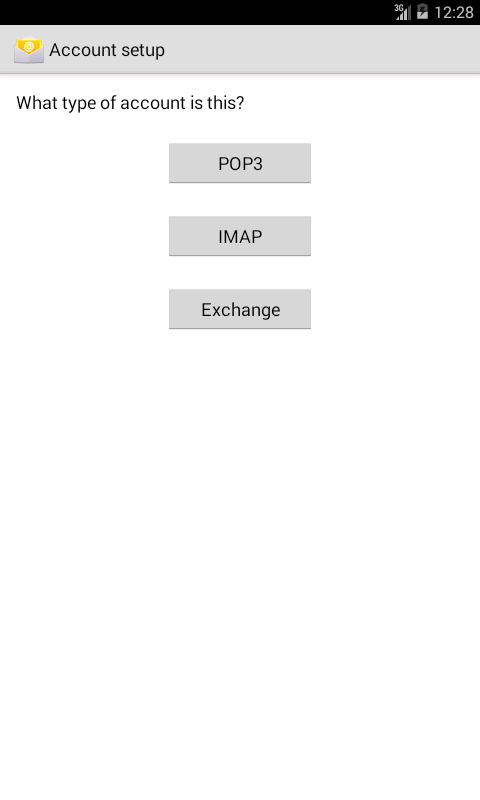
At this point you will be asked the type of account: POP3, IMAP or Exchange: for the moment we will focus on the first two, remembering that with the POP3 protocol, emails are downloaded from the server, whereas with IMAP they are left on the server and stored temporarily in device cache.
To sum up, if you choose POP3 emails will be available on your Android smartphone/tablet even without an Internet connection, but it will require more storage, while choosing IMAP you will always need an Internet connection to read emails, but you will save some space on your device. Still, if you choose POP3 you will have to take care to determine whether the email, once downloaded, will be deleted from the server and how often.
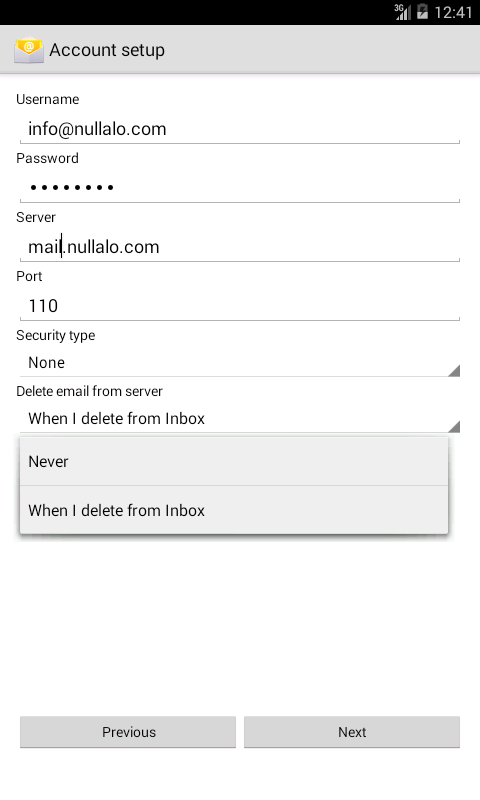
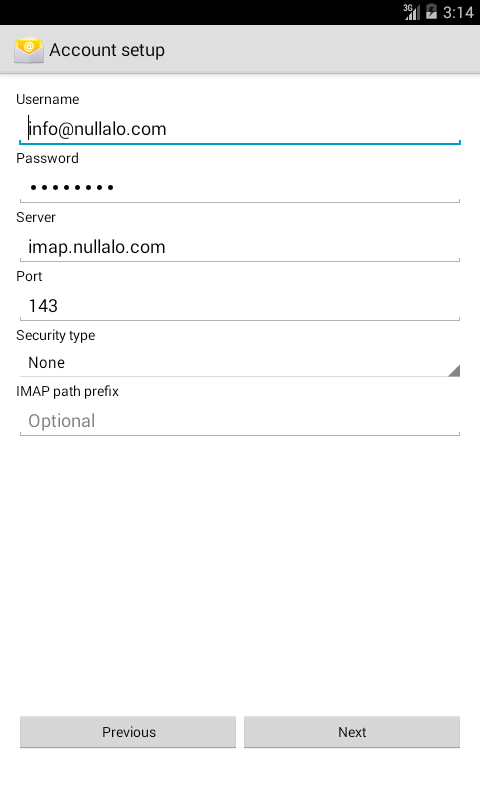
At this point you will be asked for selected incoming server parameters: all yo have to do is insert them as already explained above, paying particular attention to the server port and authentication method (“Security type“). Normally the standard ports (110 for POP3 and 143 for IMAP) does not require authentication, except different configurations by the provider. For POP3 accounts, you also need to determine whether and when to delete emails downloaded from the server.
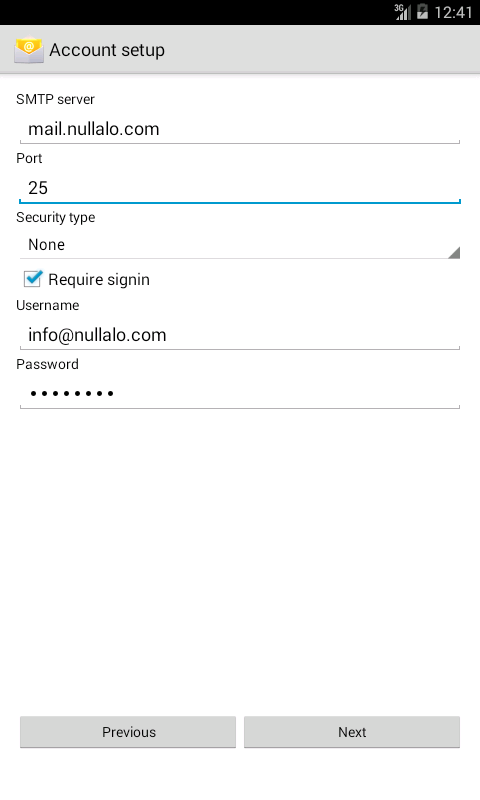
By clicking “Next” you finally get to the configuration of the outgoing mail server (SMTP). Here, too, we will have to specify port (standard is 25) and security type, and if the server requires signin: Some outgoing mail server require username and password authentication (which are usually the same used for incoming server) to enable users to send emails. In that case let “Require signin” checked, and change “Username” and “Password” entries only if for your provider they don’t match incoming mail server ones.
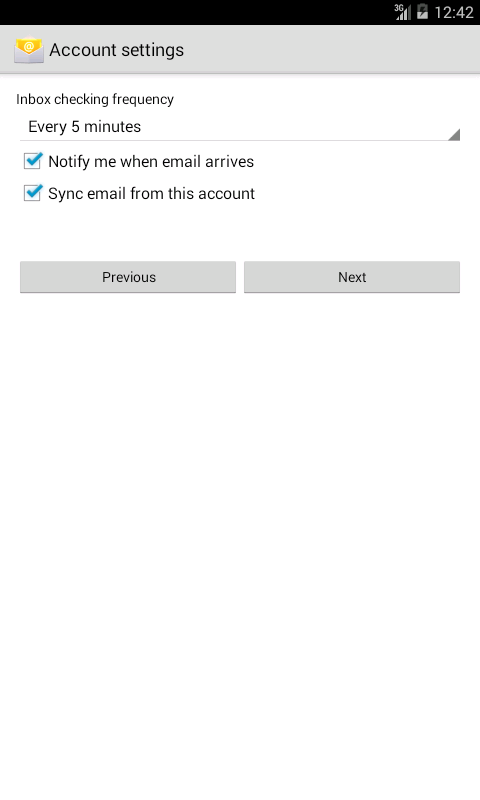
After servers verification, you are prompted to choose the inbox checking frequency, notification for new messages (“Notify me when email arrives“) and automatic account synchronization between server and device (“Sync email from this account“).

At this point account configuration is completed with the choice of a reference name for the account (as it will appear in the list of configured accounts on the device) and the name to display on outgoing messages when sending emails.

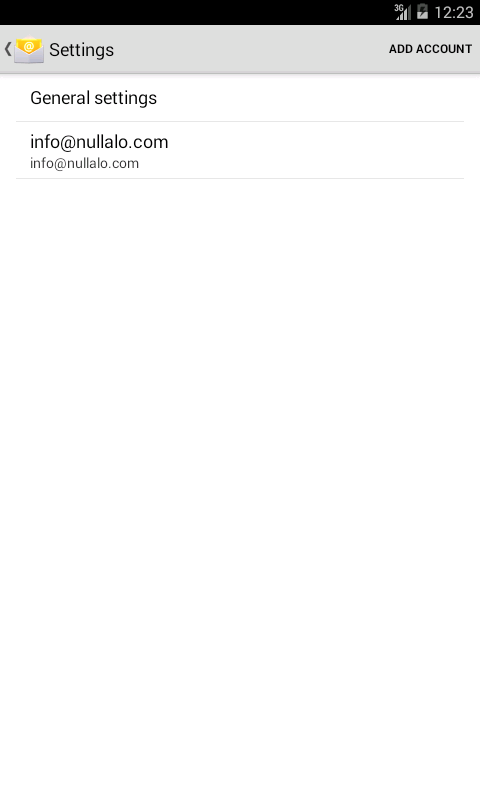
Account setup is finally complete! You can also add more accounts: within E-mail application, click on the menu button on your device, select “Settings“, click “Add account” (or the “+” sign for some devices, such as those based on Android Lollipop) and repeat the above steps.
That’s all. If you have problems, please contact us: we will be happy to help!


6 Comments
Ho appena acquistato uno Huawei GX8 il quale non mi consente di fare un account di posta elettronica di un indirizzo a dominio (il mio!). Scrivo nella schermata iniziale il mio indirizzo e la password, poi vado nella configurazione manuale e clicco su POP3, dopodiché sparisce tutto e torna alla schermata iniziale, come se non avessi fatto nulla!
E’ un bel problema per me… Devo sostituire il telefono, o c’è un trucco da qualche parte per risolvere la faccenda?
Buonasera Laura,
direi di procedere per step. Iniziamo a capire se è il client di posta elettronica dello Huawei GX8 a dare problemi. Può provare ad installare K-9 Mail (https://play.google.com/store/apps/details?id=com.fsck.k9&hl=it), un client email molto completo, anche se magari un po’ più ostico di quello stock del suo smartphone.
Mi faccia sapere se è riuscita a configurare il Suo account di posta elettronica in questa app, così da avere qualche dettaglio in più.
Buon giorno ,huawei p8 lite, cerco di eliminare l’email in arrivo selezionandoleAd venuto passaggio li vado nuovamente a selezionare nel cestino per svuotarlo. Ritorno alla schermata iniziale , mi ritornano tutte indietro e son costretto a ripetere le operazioni. Ho cecato di eliminare l’account per poi nuovamente configurarla , ma nulla succede. Questo accade da circa 10gg. Qualche soluzione? Grazie.
Ciao ho un p8 lite e non riesco a configurare la mail…inserisco tutti i dati e mi dice impossibile connettersi al server…che devo fare?
non riesco ad installare l’email imap.email sul mio p9
cerco di configurare la mia casella @email free Sul Huawey Y6 2018. ho messo il server pop3 perche imap non funziona proprio (non trova server). L’impostazione del server in arrivo è andata a buon fine. Sull’impostazione del server di uscita mi dice “impossibile stabilire una connessione al server a causa del certificato non attendibile oppure non valido” . Quale può essere il problema? Grazie