Linux: passwordless SSH login using private keys
In case you don’t know, Secure Shell (SSH) is a UNIX-based command interface and protocol for securely getting access to a remote computer. Default method for SSH access is password-based authentication: by knowing a remote system user’s username and password, you can login into the system.
Using private/public key pairs instead of (or in addition to) password authentication is a convenient, fast and potentially more secure way to access a remote system, and it’s very simple to achieve.
So, let’s see how to configure a SSH login between a client and CentOS Linux server (the procedure is the same with other distributions, maybe with some small difference) without a password using a private key.
1. Check for existing key pairs
First of all, let’s check if your client already got a key pair you can use. Assuming you have a Linux client, log into your system (client) and type:
[fsicurezza@localhost ~]# ls ~/.ssh
If you’re on a Mac, you’ll find these keys in the “.ssh” subfolder of your home directory (~./ssh/), while on Windows you should look in %USERPROFILE%\.ssh (C:\Documents and Settings\your-username\.ssh\ or C:\Users\your-username\.ssh depending on your Windows version).
If a file named “id_rsa.pub” or “id_dsa.pub” is listed, you already have a key. In this case, skip to step 3.
2. Generate a new key pair
Log into your local system (client) and generate your private key using the command “/usr/bin/ssh-keygen” with some parameters. Using the “-t” flag, we demand an “RSA” type key, which is one of the newest and safest types. With the “-C” flag, we provide a comment (which you can think of as a kind of description or label for this key): using your email address lets you identify it more easily later. After confirming this command, you’ll be asked to:
- Enter a name for this new key – just hit ENTER to accept the default name and location.
- Provide a passphrase – although SSH public key authentication can be used safely without any password, you should nonetheless enter a strong passphrase (with many characters of different type) to enhance security even further.
[fsicurezza@localhost ~]# ssh-keygen -t rsa -C "fsicurezza@nullalo.com"
Generating public/private rsa key pair.
Enter file in which to save the key (/root/.ssh/id_rsa):
Enter passphrase (empty for no passphrase):
Enter same passphrase again:
Your identification has been saved in /root/.ssh/id_rsa.
Your public key has been saved in /root/.ssh/id_rsa.pub.
The key fingerprint is:
04:53:39:ff:53:33:b7:d0:b7:7b:39:fa:32:e3:60:d9 fsicurezza@nullalo.com
The key's randomart image is:
+--[ RSA 2048]----+
|      o...       |
|       oo        |
|        .o    .  |
|       .  .  .+.o|
|        S  . ..++|
|            =  o |
|           + E  o|
|          . .+ +.|
|            .o*.o|
+-----------------+
On Windows, you can use PuTTY
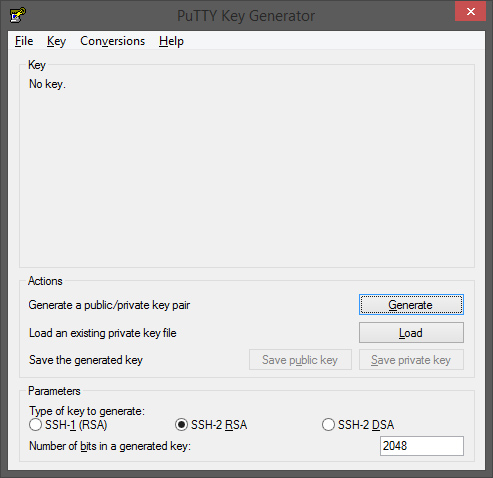
Move your mouse to generate random data, then fill “Key comment”, “Key passphrase” and “Confirm passphrase” fields with the same date explained above.
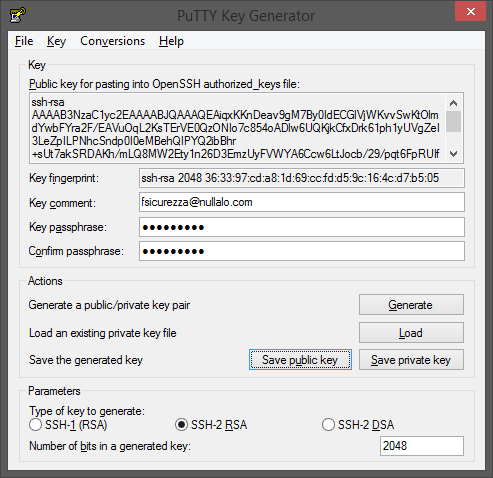
Now save both public and private keys in %USERPROFILE%\.ssh\, using id_rsa as name for private key and id_rsa.pub for public key. Since we’re going to use OpenSSH format for key pair, to save private key use “Conversions->Export OpenSSH key”, while for public key simply copy and paste content of the “Public key for pasting into OpenSSH authorized_keys file” box into an emply id_rsa.pub file.
NOTE: if you plan to use PuTTY for SSH login to your server, you need to save private key in .ppk format, by clicking on “Save private key” button.
You can also use Bitvise Tunnelier to generate your key pair: in that case, keys will be stored in HKEY_CURRENT_USER\Software\Bitvise\HostKeys registry key, but you can use the software to export them as files into another location.
We have now a private and public key set that, as already mentioned above, on Linux are typically created as /home/your-username/.ssh/id_rsa (private key) and /home/your-username/.ssh/id_rsa.pub (public key), on Mac you’ll find these in the “.ssh” subfolder inside your home directory (~./ssh/), and on Windows they are usually stored in %USERPROFILE%\.ssh\.
Your private key is an extremely valuable file, it’s like storing your password in a file. If obtained, it could be used by someone else to access your systems, so back it up and keep it safe.
If you take a look at the actual contents of your public key file, you’ll see something like this:
[fsicurezza@localhost ~]# cat ~/.ssh/id_rsa.pub
ssh-rsa AAAAB3NzaC1yc2EAAAABJQAAAQEAiqxKKnDeav9gM7By0IdECGlVjWKvvSwKtOlmdYwbFYra2F/EAVuOqL2KsTE rVE0QzONIo7c854oADlw6UQKjkCfxDrk61ph1yUVgZeI3LeZpILPNhcSndp0I0eMBehQIPYQ2ibBhr+sUt7akSRDAKh/mLQ 8MW2Ety1n26D3EmzUyFVWYA6Ccw6LtJocb/29/pqt6FpRUIfFc4TNfSJ4eOjcrc2+yL/b3H0p1ENqlenQT6lxDBbPlNRee+ UzjdDrSvmMP8f7bQVht4QzcCjrHUPa4BjUoDPkGAEDcywqIkJuNBzTYcwaPpK7QwS9lQ8lVCdtDAtRLfAkvqjMc8vLRvQ== fsicurezza@nullalo.com
3. Share your public key
To use your private key, you must share your public key with a remote server. Simply put, the remote server keeps a copy of your public key, which it uses to match against your private key when you attempt to login.
On Linux, there is a utility which automatically installs our public key onto a remote host: ssh-copy-id. Let’s say you know the password of the “admin” account on “nullalo.com” server, on which you want to share your public key. In this case we will type:
[fsicurezza@localhost ~]# ssh-copy-id -i /home/fsicurezza/.ssh/id_rsa admin@nullalo.com
admin@nullalo.com's password:
[fsicurezza@localhost ~]#
You can also paste the key using SSH:
[fsicurezza@localhost ~]# cat ~/.ssh/id_rsa.pub | ssh admin@nullalo.com "mkdir -p ~/.ssh && cat >> ~/.ssh/authorized_keys"
If you want to do it manually, the concept is that /home/your-username/.ssh/authorized_keys (on some systems file name is authorized_keys2) file on the remote server must contain a row for each allowed client’s public key.
4. Additional security
Once you have copied your SSH public key on your server and ensured that you can log in with the SSH keys alone, you can go ahead and restrict the root login to only be permitted via SSH keys.
In order to do this, open up the SSH config file:
sudo nano /etc/ssh/sshd_config
Within that file, find the line that includes PermitRootLogin and modify it to ensure that users can only connect with their SSH key. If the line does not exist or is commented, simply add it:
PermitRootLogin without-password
Reload service to put the changes into effect:
service sshd reload
5a. Login with no Password from Linux client
Assuming you’ve followed the above steps, now you can access remote server simply typing:
[fsicurezza@localhost ~]# ssh admin@nullalo.com

Last login: Mon Mar 21 10:28:33 2016 from 192.168.0.1

[admin@nullalo.com ~]#
with no password entry required, except for passphrase if you used it during key pair generation.
5b. Login with no Password from Windows using Bitvise Tunnelier as client
On Windows, we can use Bitvise Tunnelier or PuTTY to access via SSH to our server.
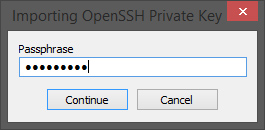
With Bitvise Tunnelier, you need to import your private key by clicking on “Client key manager“, then “Import” and finally select your “id_rsa” file.
You will be asked for passphrase, if used during key pair creation.
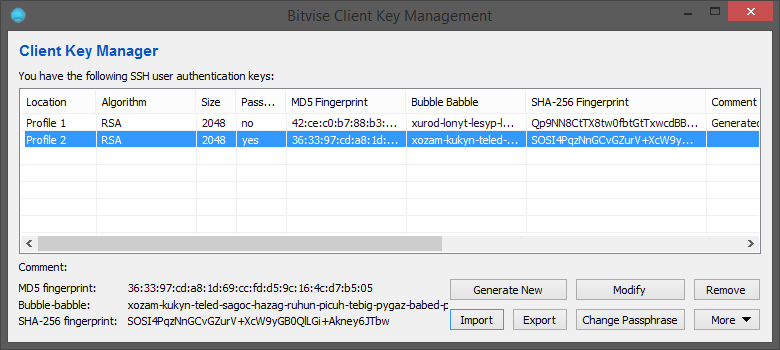
Now you can login by selecting publickey as “Initial method” and choosing the right Client key (in the example the one named “Profile 2”).
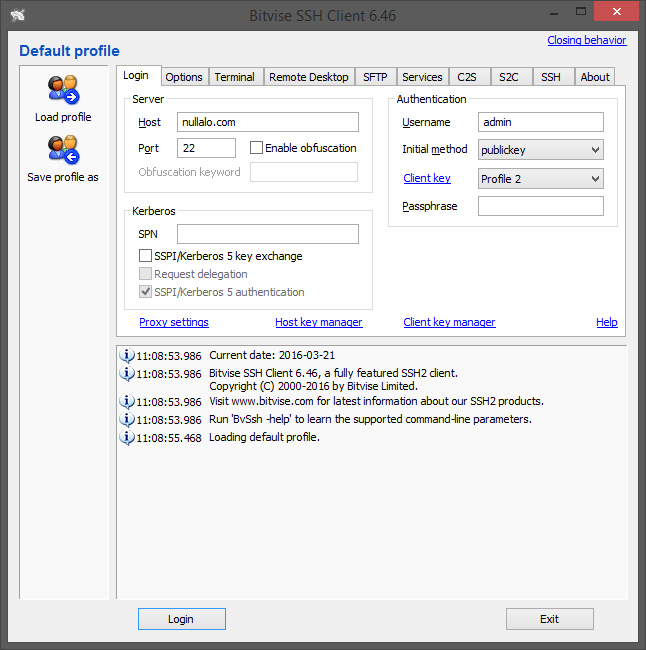
After clicking on “Login”, you will be asked to save the host key (only for the first connection):
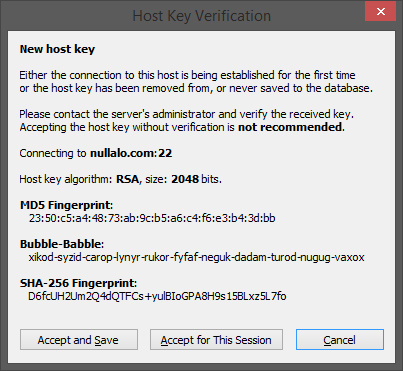
Click on “Accept and Save”, then you’ll be asked for public key’s passphrase (this is the password of the key pair, NOT the password of the user logging in) if needed.
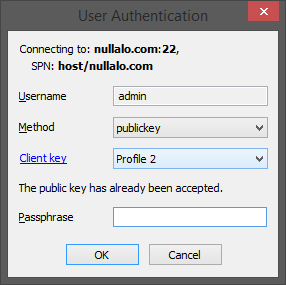
If everything’s ok, you will be logged onto remote server.
5c. Login with no Password from Windows using PuTTY as client
If you wish to use PuTTY as client instead of Bitvise Tunnelier, you have to specify the location of your client’s private key (that matches the public key you stored on the server in the authorized_keys file) in Connection->SSH->Auth->Private key file for authentication.
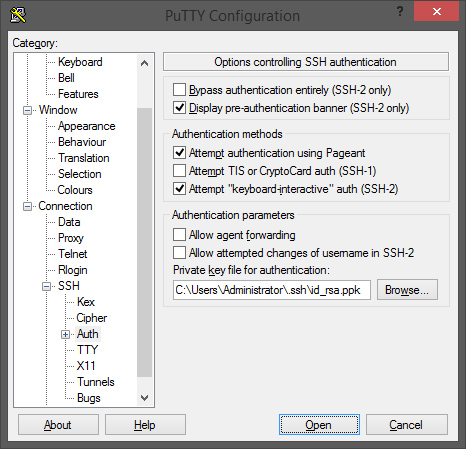
NOTE: Private key must be stored in .ppk format if you want to use it with PuTTY.
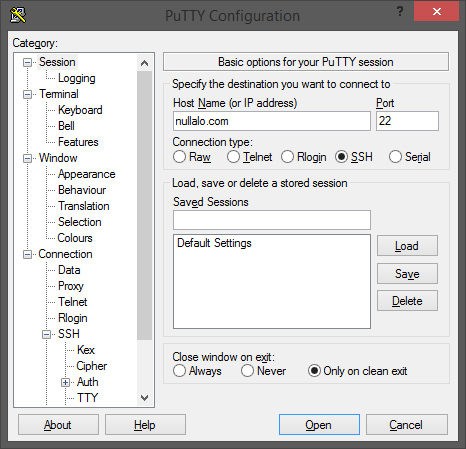
Now just fill in your connection details (Host Name or IP address and Port) and click “Open”:
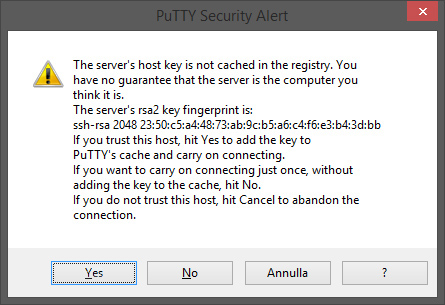
After the warning about the server’s host key not being cached in the registry (you can answer “Yes”):
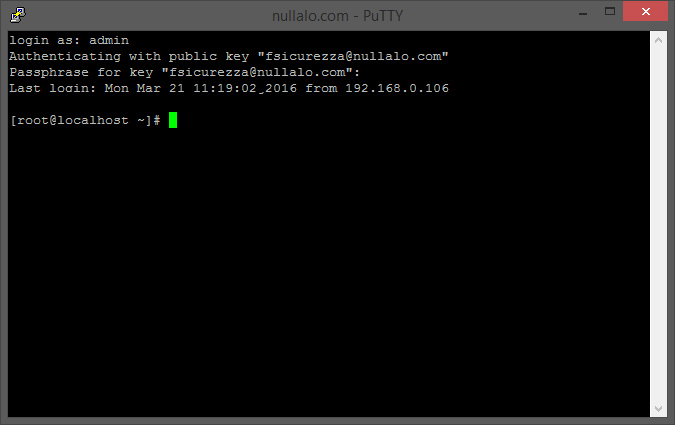
you will be asked for username (in our example, “admin”) and eventually for key pair’s passphrase, then you’ll be logged into the system.
That’s it! If you have any question, please don’t esitate to add a comment to this article.


No Comment