


Install Cisco VPN Client on Windows 7/8.1/10

One last error that may occur on Windows 8.1/10 is the following:
Reason 442: Failed to enable Virtual Adapter
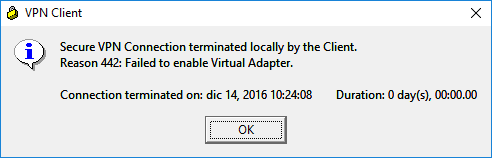
In this case, you’ll need to edit the following registry key:
HKEY_LOCAL_MACHINE\SYSTEM\CurrentControlSet\Services\CVirtA
in the following way:
32 bit: from “@oem8.inf,%CVirtA_Desc%;Cisco Systems VPN Adapter” to “Cisco Systems VPN Adapter“
64 bit: from “@oem8.inf,%CVirtA_Desc%;Cisco Systems VPN Adapter for 64-bit Windows” to “Cisco Systems VPN Adapter for 64-bit Windows“
Well, that’s all! Now you can import your .pcf files and start a VPN connection with your private networks.


3 Comments
Hi my friend! I want to say that this article is amazing,
great written and include almost all significant infos.
I’d like to see more posts like this .
Ottimo articolo: chiaro, puntuale e soprattutto risolutivo. Complimenti!!
…..llevo mucho tiempo, borrando, instalando !!
….esto es oro puro, muchas gracias por este apoyo ¡¡